
Recently, I thought of upgrading various softwares on my MAC OS including Java, AnypointStudio and all other softwares. So, I downloaded new version of MuleSoft Anypoint Studio on my MAC OS. After installing AnypointStudio, when I opened it for the first time, I immediately encountered an issue.
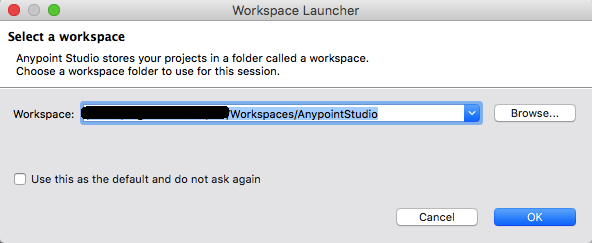
Guess what, the very first screen – Workspace Launcher was frozen. I was not able to type-in workspace location, I was not able to click on browse button, I was not able to click on cancel or ok button. What a bummer!!
After some trial and errors, I finally found the solution to fix the problem. I am not sure why, but looks like Anypoint Studio does not work with Java 9. As part of upgrade process, I had upgraded the Java version from 7 to 9. Either you will have to uninstall Java 9 and go back to Java 7 (I did not test this with Java 8) or you can follow below steps to make it work. Install Java 7 in addition to Java 9 on MAC OS.
- Get the Java 7 location, we will need this location.
- Open Terminal and go to the folder where you have AnypointStudio.app
- cd AnypointStudio.app/Contents/MacOS
- Here you will find a file named AnypointStudio
- Execute this command: ./AnypointStudio -vm <Java_7_Location>/bin
- You will see “Workspace Launcher” screen
- Now, you can select different workspaces.
So every time I will have to open AnypointStudio using command line? Seriously? Well, no! There is another solution, probably better solution.
-
- Get the Java 7 location, we will need this location.
- Open Finder and go to the folder where you have AnypointStudio.app
- Right click on AnypointStudio.app and select “Show Package Contents”
- Now go to “Contents” and then “Eclipse” folder
- Now open AnypointStudio.ini file in your favorite editor.
- Make sure you add following lines after -startup and before –launcher.library and -vmargs
- Also note that, AnypointStudio.ini does not recognize JAVA_HOME variable, so you will need complete path for Java location
- Save the file and now open Anypoint Studio.
- You will see “Workspace Launcher” screen
- Now, you can select different workspaces.
Hope this will be helpful.